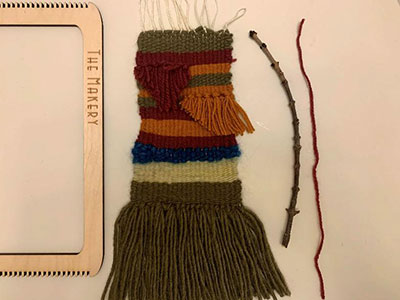
WOVEN TAPESTRY FOR BEGINNERS
- The Makery

- Apr 14, 2020
- 3 min read
by Priyam Mukharya
What You’ll Need:
Shed Stick
Strong Thread (this will be used for the warp [vertical threads] and should be durable for a sturdy foundation)
Needle
Assorted Yarn (for the weft (horizontal threads) Any assortment of colors, thickness will do.
A Dowel or Stick (for hanging purposes)
Scissors
Fork or Comb
Pencil
Creating the Warp
Tie the string onto the first peg at the top
Pull the thread down and around the bottom peg directly below the one with the knot
Bring the thread back to the top and wrap around the second peg
Repeat until the desired width is achieved
Tie the string onto the last peg used, make sure the warp strings aren't too loose or too tight, this will make weaving much easier.
Insert the shed stick over and under, push it down
Begin Weaving
Start with weaving 12 rows also called as Tabby, that will create a heading which will create as an anchor for the rest of the weaving
Start at least three warp threads in, leaving a 2"+ tail of thread on the back.
Weave in an alternating over/under pattern
Weave back the other direction in the opposite over-under pattern.
Make sure all weft (horizontal strands) are pushed tightly together.
Use a fork or comb to push down the weft
*To make weaving easier, an additional "shed stick" can be used. I used a pencil; a paint stirrer or ruler also works well!
Bottom Row Tassels
Weave the 12 rows first and start making tassels on them as a base
Cut tassel strands to desired length (the number of strands will depend on the thickness of the yarn as well as desired bulkiness)
Three warps in, weave the strands under two warp strand and out
Pull the strands up through the middle of the two warp strands
Push the tail ends through the loop created in step three
Gently pull the ends to tighten the knot
To put more next to each other skip one warp strand the create another knot
Push all the Tassels to the weft
Weaving After Tassels
Repeat the same process, again weave 12 rows of weft
If you run out of thread or want to switch to a different color: End the current thread so the tail is in the back, preferably at least 3 warps in.
Push strand down
Start the new strand at the end of the previous one. Leave a 2"+ tail in the back and continue the weaving pattern.
Use as many colors you want and as many wefts, play with colors
The Rya Knot
Cut tassel strands to desired length (the number of strands will depend on the thickness of the yarn as well as desired bulkiness)
Three warps in, weave the strands under two warp strands and out
Pull the strands up through the middle of the two warp strands
Push the tail ends through the loop created in step three
Gently pull the ends to tighten the knot
To put more next to each other skip one warp strand the create another knot
Chop Off the Rya Knots
Chop off the rya knots any size or shape
Make sure to use a sharp scissor
The rya knots likely left some gaps on the sides and in the center. Fill those in by weaving in an over/under pattern.
Continue weaving with desired colors until satisfied
Cleaning Up the Back
Flip the loom over and clean up the loose ends!
Either tie strands together and cut excess (this can get bulky) or sew the tails through the back of the tapestry
Taking the Tapestry Off the Loom
Bottom Loop
Take the bottom loops off first
Lift up the fringe and take out shed stick
Carefully take the loops out of each peg
Start by knotting the ends, take the loose end and the one next to it and tie them together with an overhand knot
Repeat the process for every single individual loop
Top Loop
Carefully take off the top loops from the pegs
Knot the same way as the bottom loops
Finishing Touch
Lastly, tie the ends of a long piece of yarn to each end of the stick and enjoy your new wall hanging


Comments